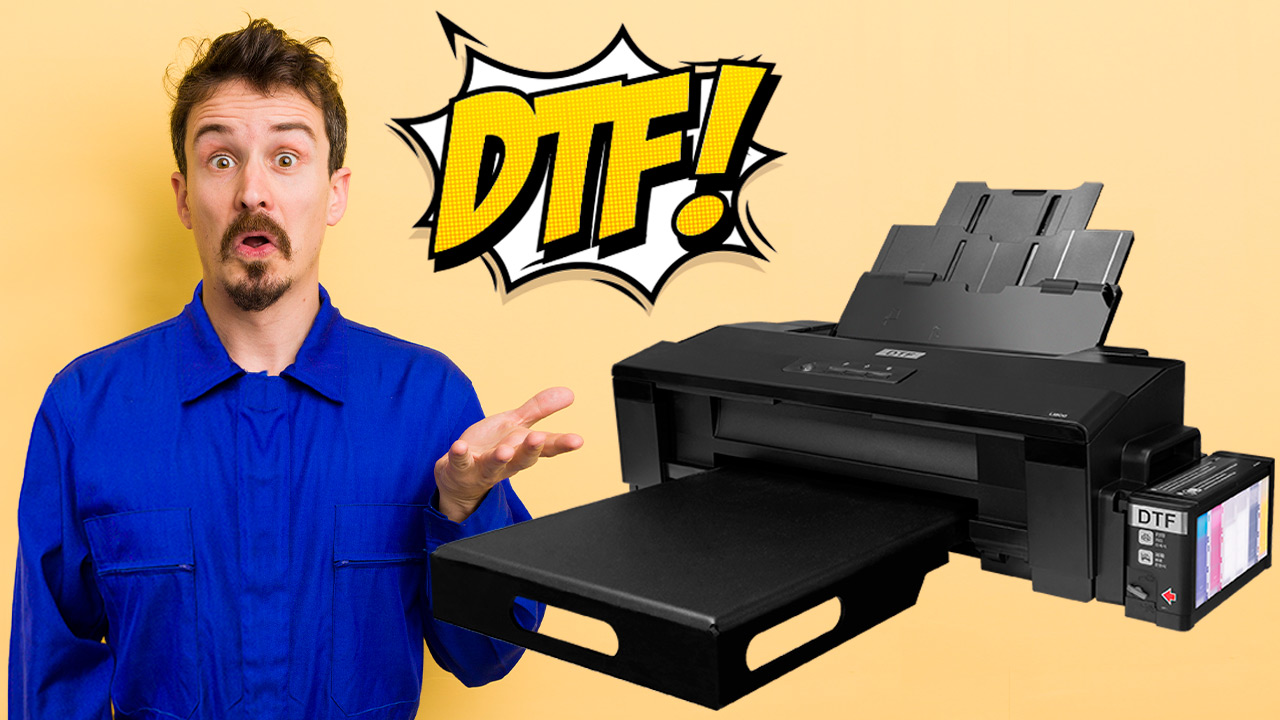
The Epson EcoTank 8550 is a powerful printer known for its high-quality photo printing and refillable ink system. But did you know it can also be turned into a DTF (Direct-to-Film) printer? This type of printing is great for creating custom t-shirts, bags, and other fabric items. It works by printing a design onto a special film, which is then transferred onto fabric using heat and pressure.
Many people choose DTF printing because it’s easy to use, works on many types of fabric, and produces vibrant, long-lasting prints. If you already have an Epson 8550, converting it to a DTF printer can be a smart and cost-effective way to start printing custom designs at home or for a small business.
In this guide, you’ll learn exactly how to convert the Epson 8550 into a DTF printer. We’ll walk through the steps, tools, software, and tips needed for a successful setup. Whether you’re new to DTF or ready to upgrade, this guide has everything you need.
Preparation
Before you begin printing with DTF technology, you need to carefully prepare your Epson EcoTank 8550. This step is very important because it ensures your printer will work properly with DTF ink and film. Below are the steps you should follow during the preparation phase:
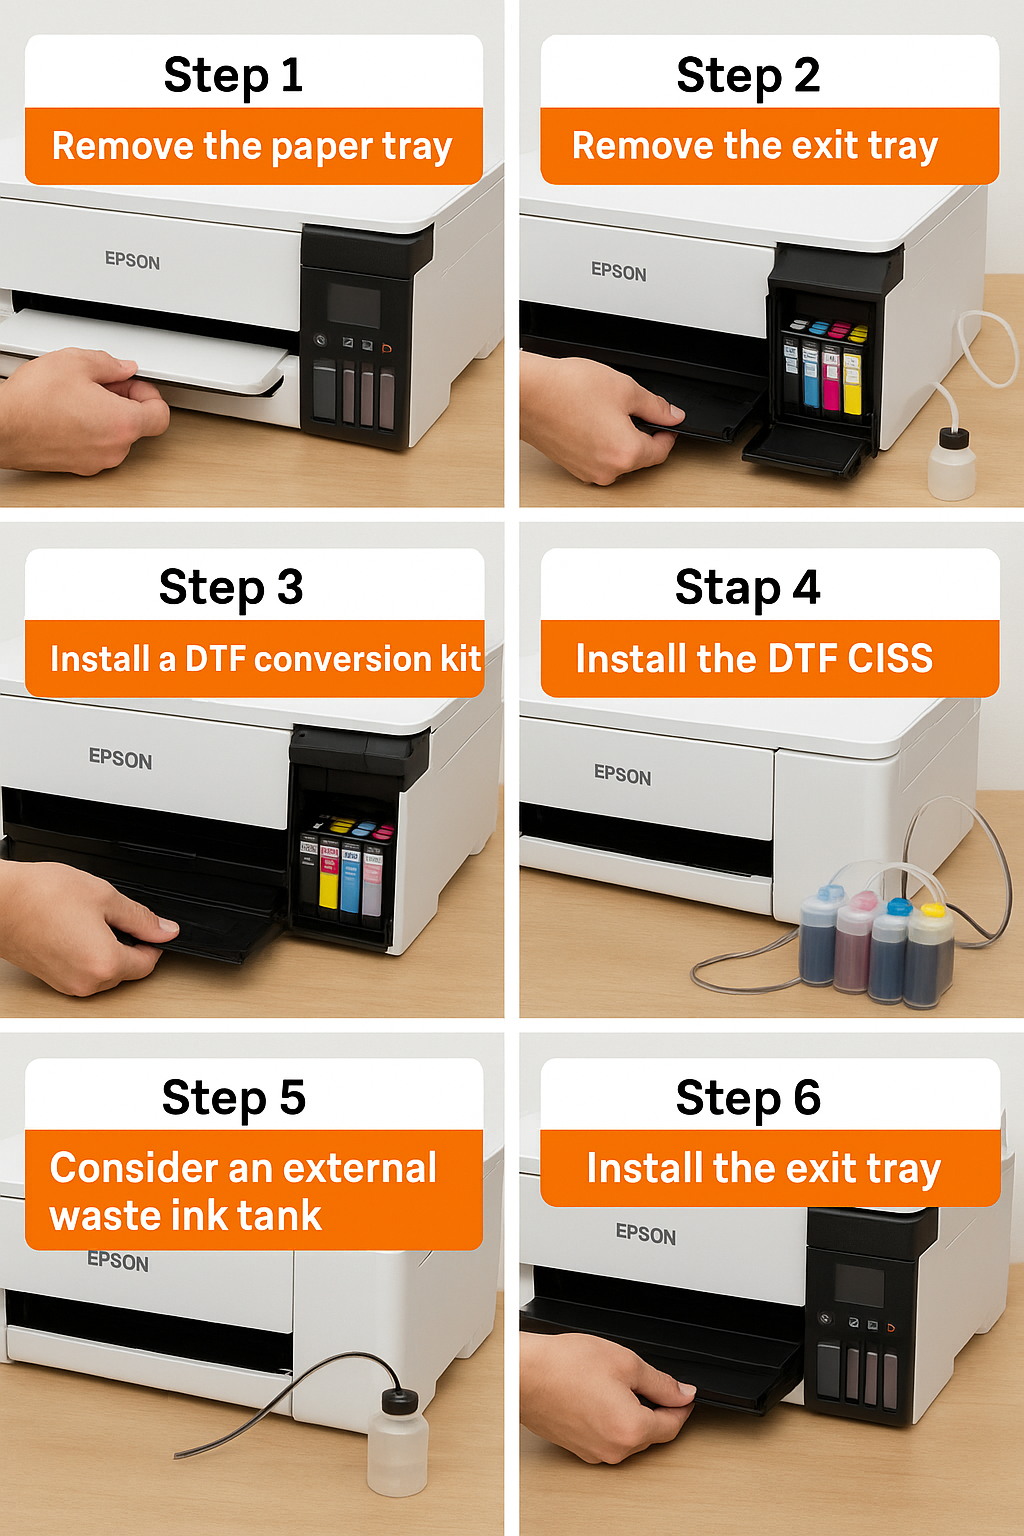
Remove the paper tray
Start by removing the paper tray from the bottom of the Epson 8550. This tray is designed for standard paper printing and may not support DTF film correctly. To remove it, gently pull the tray out from the front of the printer. Set it aside in a safe place. This helps prevent paper jams and provides more space for feeding film smoothly through the printer.
Remove the exit tray
Next, take out the exit tray where printed paper usually rests. This part is also not needed for DTF printing. Removing it allows the printed film to exit the printer flat without curling or bending. Be gentle to avoid damaging the tray or the printer. Once removed, store it safely with the paper tray in case you want to return the printer to its original condition later.
Install a DTF conversion kit
Now, install a DTF conversion kit made specifically for the Epson 8550. These kits usually include ink cartridges or refillable tanks, ink lines, film sheets, and sometimes a white ink circulation system. Follow the instructions that come with your kit closely. The kit should match your printer model exactly to avoid any problems during setup. Make sure all parts are securely installed before moving on.
Install the DTF CISS
A Continuous Ink Supply System (CISS) is often included with DTF kits. It provides a constant flow of ink to the printhead, reducing the need for frequent refills. Place the ink tanks beside or on top of the printer, depending on your setup. Connect the ink lines to the printer’s ports, making sure they are tight and leak-free. Label each tank to avoid mixing up the inks during refills.
Consider an external waste ink tank
The Epson 8550 stores waste ink inside the printer. Over time, this tank can fill up and cause printing errors. To avoid this, you can install an external waste ink tank. This is a small container connected to the printer’s waste ink outlet. It collects used ink from cleaning cycles and keeps it away from the internal pads. You can make this modification using a waste ink tube and a clean bottle. This setup is easy to monitor and empty when full.
Install the exit tray
After all modifications are done, you can reattach the exit tray if your setup allows it. Some users leave it off to let the film drop straight onto a flat surface or drying tray. However, if your DTF film feeds smoothly with the tray on, you may keep it in place. Just make sure it doesn’t bend or scratch the film as it comes out.
With these preparation steps completed, your Epson 8550 is now physically ready for DTF printing. Next, we’ll go over the software setup and how to get your printer running with RIP software and DTF inks.
Software and Printing
Once the hardware preparation is done, the next step is setting up the software and loading the printer with DTF ink. This stage is just as important as the physical setup because proper software and calibration help you get bright, accurate, and professional-quality prints. Follow these steps to get your Epson 8550 ready for printing with DTF.
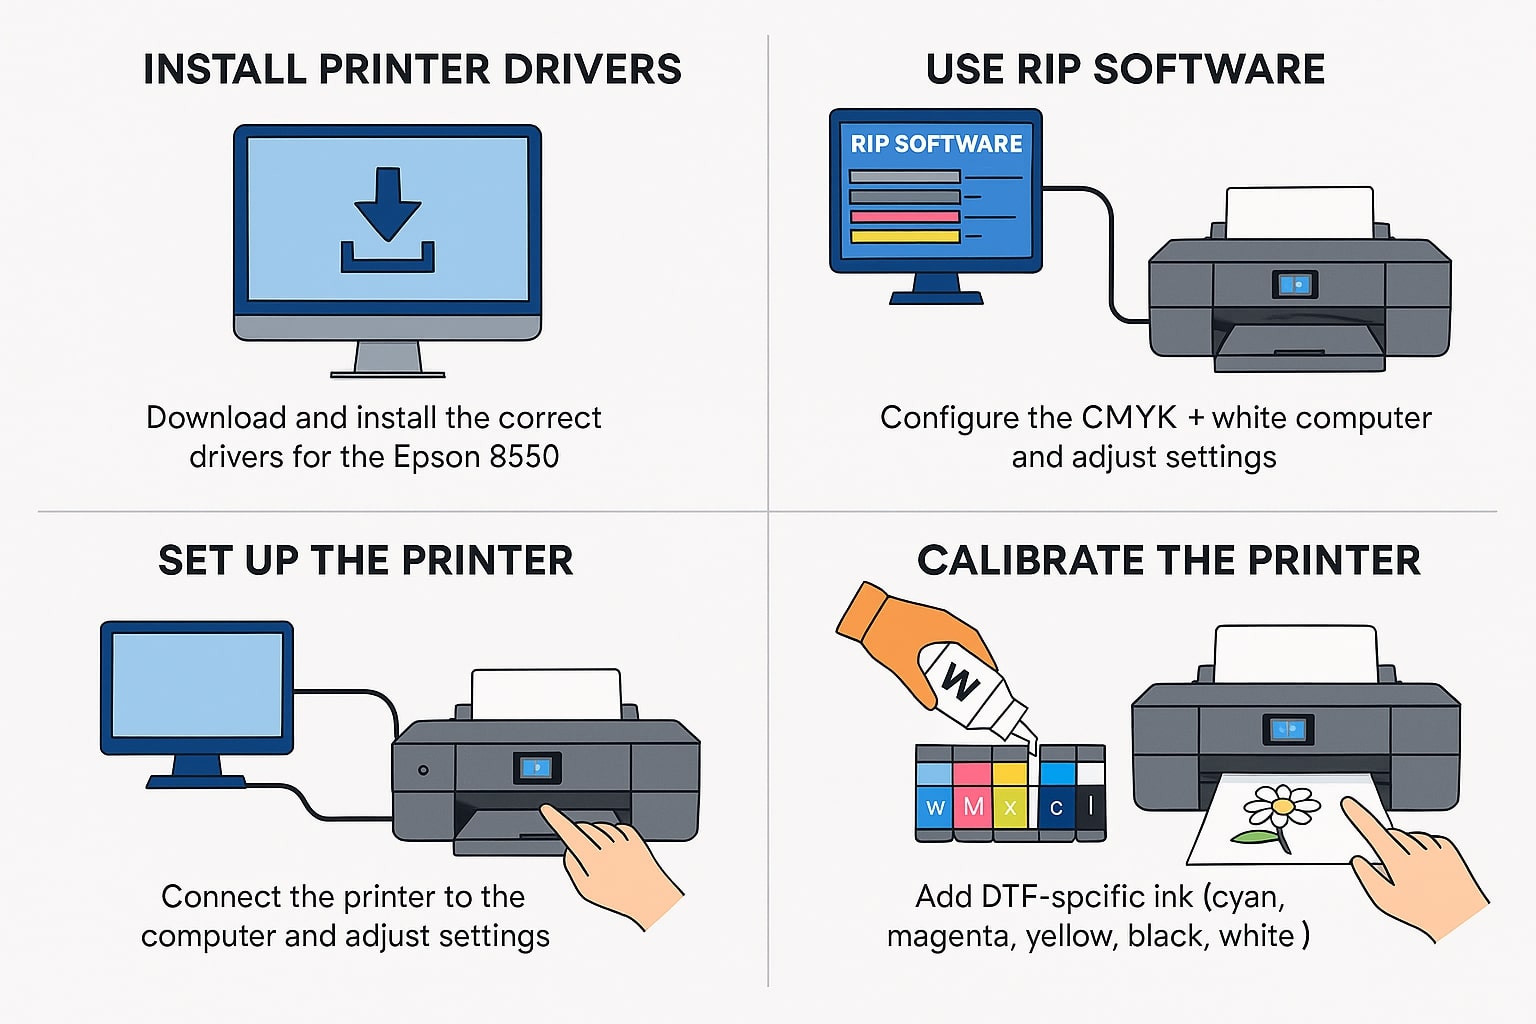
Install printer drivers
First, make sure the correct printer drivers are installed on your computer. These drivers allow your computer to communicate with the Epson 8550. Visit the official Epson website and download the latest drivers that match your operating system (Windows or Mac). After downloading, run the installer and follow the on-screen instructions to complete the setup. Restart your computer if needed. A working driver ensures the printer can receive and process the print jobs correctly.
Use RIP software
RIP (Raster Image Processor) software is required for DTF printing. This special software controls color output, ink levels, white ink underbase, and print layout. Popular RIP software choices for DTF include Acrorip, DigiRIP, and Cadlink. Choose one that supports the Epson 8550.
Once you’ve installed the RIP software, open it and configure it for your printer model. This includes selecting the color channel order (CMYK + White), setting print size, and adjusting ink limits. The software also helps in printing the white ink layer behind colored designs, which is important for transfers onto dark or colored fabrics.
Set up the printer
After the software is ready, connect your Epson 8550 to the computer using a USB cable or a wireless connection. Turn the printer on and make sure it’s recognized by your system. Open the printer settings in your RIP software and verify that the printer model and connection are correct.
You may also need to adjust printer settings like paper type (use “Photo Paper” or “Glossy”), print quality (select “High” or “Best”), and drying time. These settings help the DTF film accept the ink properly without smearing or blotting.
Fill ink tanks
Now it’s time to fill the ink tanks with DTF-specific ink. These inks are different from regular Epson inks and are specially made for transferring designs to fabric. Open the ink tank lids and slowly pour in the correct colors: Cyan, Magenta, Yellow, Black, and White. Be sure to fill each tank with the correct color, and never mix regular ink with DTF ink.
White ink usually goes in one or more of the photo black or gray tanks depending on your DTF setup. Always refer to your conversion kit instructions to know where the white ink should be placed. Make sure all tanks are filled to a safe level and that no air bubbles are trapped in the ink lines.
Calibrate the printer
Calibration is the final and one of the most important steps. It ensures that the ink is printing evenly and that the colors align properly. Start by printing a nozzle check to see if all colors are coming out clearly. If any lines are missing, run a cleaning cycle.
Next, print a test image with both color and white ink. Check for proper alignment, color accuracy, and ink coverage. If the white layer is misaligned with the color layer, go into the RIP software and adjust the white underbase settings. You may also need to tweak color curves and ink flow rates to match your film and fabric types.
Repeat test prints until the result looks clean, sharp, and fully covered. Once everything is dialed in, your Epson 8550 is ready to print custom DTF transfers.
Maintenance
Proper maintenance is key to keeping your converted Epson 8550 DTF printer running smoothly. DTF ink, especially white ink, can clog the printhead if not cared for daily. Follow these simple steps to prevent printing problems and extend the life of your printer.
Daily cleaning
DTF printers need regular cleaning to prevent ink buildup and clogged nozzles. Each day before or after printing, run a nozzle check to ensure all color channels are firing correctly. If you notice broken or missing lines, perform a head cleaning through the printer menu.
Also, wipe the printhead area gently with a lint-free cloth or foam swab. Be careful not to damage any parts. Clean the capping station and wiper blade regularly. These parts collect excess ink and can get sticky or clogged, especially with white ink. Use a cleaning solution made for DTF printers when wiping these parts.
If your printer is not used daily, consider printing a small test sheet each day. This keeps ink flowing and stops it from drying inside the nozzles.
White ink stirring
White ink is thicker than colored ink and settles quickly at the bottom of the tank. If left still, it can harden and clog the printhead. To prevent this, the white ink should be stirred or shaken daily.
Some users install automatic white ink circulation systems, which keep the ink moving. If your setup doesn’t include this, shake the white ink tank gently by hand every day. Also, gently shake the white ink bottles before refilling to make sure the pigment is well mixed.
Considerations
Before and during the use of your converted Epson 8550 DTF printer, you should understand some important factors. These considerations help you avoid common issues and make better decisions for your printing success.
Ink compatibility
Never use regular Epson ink in a DTF printer. DTF ink is specially made to stick to film and transfer to fabric with heat. Mixing ink types can cause clogs, poor print quality, and damage to your printer. Always buy high-quality DTF inks that are made for your specific printer model.
Also, check that the ink works well with the type of film and powder you plan to use. Compatibility between ink, film, and fabric plays a big role in final print results.
Waste ink management
When printing or cleaning, the Epson 8550 produces waste ink. If not handled correctly, the built-in waste ink pads can overflow, leading to printer errors. That’s why installing an external waste ink tank is a smart move.
Use a waste ink bottle and connect it to the printer’s waste tube. Check the bottle often and empty it before it fills up. This setup helps you avoid unexpected printer shutdowns and reduces the chance of a mess.
RIP software
RIP software is required for proper DTF printing. However, not all RIP programs are easy to use or compatible with every printer. Before buying one, make sure it supports the Epson 8550 and DTF workflow.
Look for features like white ink layering, ICC color profile support, print speed control, and easy user interface. If you’re new to RIP software, try to get one with tutorials or good customer support.
Professional help
If you’re not confident doing the conversion yourself, it’s okay to ask for help. Many shops and online services offer professional DTF conversion for Epson printers. They can install the kit, set up the software, and test the printer for you.
Video
Final Thoughts
Converting your Epson 8550 into a DTF printer is a smart way to expand your creative or business potential. With the right tools, careful setup, and daily care, this printer can deliver bright, long-lasting prints on all types of fabrics. While the process may seem detailed, it becomes simple when broken into clear steps: preparation, software setup, maintenance, and daily use.
Always use high-quality DTF inks and compatible film to get the best results. Don’t forget to clean the printer regularly and stir the white ink to avoid clogging. A reliable RIP software program is also a key part of your printing success.
Whether you’re a hobbyist or starting a custom printing business, converting the Epson 8550 to DTF can give you a strong, affordable setup. Just follow this guide closely, take your time, and ask for help when needed. With patience and care, your new DTF printer can bring your designs to life beautifully.